Setting Your Wedding Day Beauty Schedule

Molly Peach Photography

Molly Peach Photography

As your wedding day gets closer, you’re going to need to start locking in the timeline for all your vendors. There is so much to think about - what time will the flowers arrive? Will you be available to meet the florist at the door or will you be busy in hair and makeup? What about First Looks? When does the caterer need to start setting up? What about if the venue has limitations on what time you can get into the premises?

Wow. I’m overwhelmed just writing that. Y’all, planning a wedding is not easy, so I have some tips for scheduling your hair and makeup timeline on the Big Day!

First things first - ask your beauty vendors how much time they need to allot per person. Then, decide whether you’ll be doing photos before the ceremony. Will you be doing First Looks? What about photos of the family and wedding party?

Taylor Kern Photography

Taylor Kern Photography

Here’s a few scenarios that will help dictate the timeline:

If you’re only doing First Looks but saving the wedding party photos for after the ceremony, ask your photographer what time they would like you and your fiance(e) ready for photos. Your beauty vendors can finish up your wedding party while you’re off taking pictures.

If you’re doing the wedding party photos pre-ceremony as well as First Looks, check and see what time your photographer wants everyone to be ready. Your beauty team can still finish up your wedding party while you and your fiance(e) are off doing First Looks, as long as everyone else is completed by the time the group photos will start.

If you’re not doing First Looks but you are doing group photos before the ceremony, then obviously everyone needs to be ready at a certain time, and your photographer can help you navigate what time that should be.

If you’re not doing photos before the ceremony at all, I suggest having everyone completely ready an hour before the ceremony is set to begin. This gives everybody time to change into their wedding outfits, find their shoes and jewelry (the Getting Ready suites can get messy very quickly with so many things going on!), and allows time for the beauty vendors to do touch ups if needed.

If there’s travel time involved between where you’re getting ready and the ceremony, make sure you allow for at least an hour in between. Trying to corral so many people from one place to the next can be very chaotic - someone forgets a bouquet, someone lost a shoe, etc. You want to have plenty of time so you’re not stressing if something goes awry. And remember: if something does go amiss, it’s good to be prepared, but it will be okay. Breathe. Guests will probably have no idea that something went wrong.

Kaitlyn Blake Photography

Kaitlyn Blake Photography

Something else you need to consider is the actual timeline of who’s getting hair and makeup done at what specific times. This is where having a separate hair and makeup person comes in handy, especially if you have more than two or three people in your wedding party who are receiving beauty services. Another advantage to having two (or more) artists working at once is that it shortens the timeline for the Big Day, so you’re not all up at the crack of dawn to make sure there’s plenty of time to get everyone done with hair and makeup. It’s a good idea to communicate a schedule between both artists, or even CC them on one email chain so everyone is on the same page. And hey, some artists will go out of their way to communicate with the other beauty vendors and coordinate a schedule without you having to put in any effort! You want to make sure the schedule is set so that someone is not supposed to be in the hair stylist’s chair and the makeup artists’s chair at the same time. Although, should this happen, it’s not the end of the world - we typically know how to work around each other as long as the space allows for it.

Another question that pops up a lot is: What time should the Soonlywed get hair and makeup done? I try to get the Soonlywed in my makeup chair either second-to-last, or third-to-last if they’re doing hair after makeup. This allows time for him/her/them to relax before changing into the wedding outfit, grab a bite to eat, let the makeup settle a bit, and then I can provide any lipstick or powder touch ups if needed.

I know this is a lot to take in, but if you’ve hired seasoned wedding vendors, they can definitely help guide you through the process. Don’t be afraid to ask for help! That’s what we’re here for (within reason) and this coordinated effort is part of what you’re paying for when you hire us.

Good luck, and congratulations!


Planning a wedding? Reach out to inquire about professional makeup services for you and your wedding party!
5 Tips For Doing Your Own Wedding Makeup

Doing Your Own Wedding Makeup_.png

Not everyone wants to bring in a professional makeup artist for their wedding day. Sometimes it’s not aligned with your budget or maybe you don’t feel comfortable with someone else touching your face, and you feel it would be less stressful to just do it yourself. Whatever your reasoning, there are a few key tips that you can take from the professionals to make sure your wedding makeup looks amazing in person and in photos.

Doing Your Own Wedding Makeup_ (1).png

I know the common idea about wedding makeup is that it needs to be, like, 10x what you’d normally do, in order to “show up in photos.” This is true to an extent; however, with the amazing photography lenses and tools available these days, cameras generally capture what’s in front of them pretty spot-on. You can turn up the volume of your makeup a bit, especially if you don’t normally wear any, but you don’t need to go full on Mimi (okay, you can tell I’m old if you don’t get that reference). It’s important to pay attention to the editing style of your photographer. If they’re more “light and airy,” yes, soft peachy blushes or pink eyeshadows might get a little washed out so consider amping it up. If their photography style is on the dark and moody side, I’d go easier on a smokey eye because it can end up looking super black once they’re done with editing. From a makeup artist standpoint, we have a knack (and the experience) for knowing just how heavy the makeup needs to be to look great across all styles, but for someone who is not used to doing makeup for photography purposes, it’s a good idea to research and check out the makeup styles your photographer’s previous clients have done. Basically, it doesn’t have to be as heavy handed as it used to be back in the day.

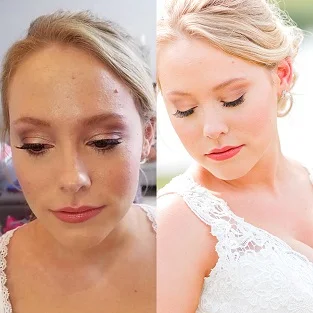
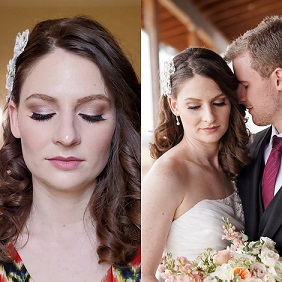
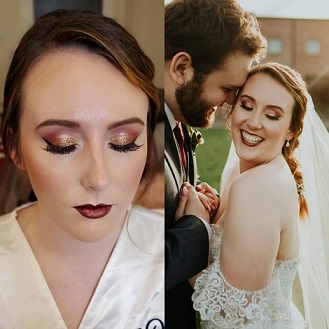
Here’s a few examples of what the makeup looked like from my regular phone camera compared to the wedding photos from a professional photographer. The first, as you can see, has a bright and airy feel. The second was natural lighting so not much difference at all. The third has a slightly more dramatic and moody edit which was perfect for the glam style we chose for this bride’s makeup.

(Kaitlyn Blake Photography/Noreen Nooner Photography/Jess McGill Photography)

Doing Your Own Wedding Makeup_ (2).png

Moisturize, but furthermore, adopt a good skin care routine a few months before your wedding and stick to it. You’d be amazed at how makeup that’s done with excellent technique can still look not-so-great on skin that’s been neglected. Skin care is the most crucial part of a good makeup application. Even if you think you’re oily, you still need to moisturize to create a balance for your skin. Your face goes through a lot in the day-to-day activities - sun damage, pollution, dehydration. It all takes a toll. So always cleanse your face, moisturize, and use sunscreen (sun damage is THE #1 reason for faster aging/unhealthy skin). Do a facial mask (one that you know you won’t have a reaction to) the night before your wedding for extra glow. You can gently exfoliate that morning for a nice, smooth base for makeup. And then on the day of your wedding, make sure your skin is nice and hydrated with a good moisturizer, and really give it time to sink into the skin before you do your foundation. Keep in mind that skin care can be different for everyone, depending on if you have sensitivities or other issues. These are very basic tips, and your skin may have different needs. That’s why it’s important to adopt a good routine months prior to your big day so that you’re not stressing over whether you’ll have a reaction to a product.

Doing Your Own Wedding Makeup_ (3).png

I think many of us have seen the infamous Flashback Mary by now. Flashback is what happens when your makeup causes a white cast to show up in flash photography. Your photographer may bust out the flash later in the night when the sun has gone down and everyone is grooving on the dance floor during the reception, and you don’t want to be surprised when you receive your wedding gallery and realize it’s full of photos of you looking like a ghost. So how can you avoid that?

For starters, titanium dioxide, zinc oxide, and silica powder are the main causes of flashback. But it can get confusing because some products may be high in titanium dioxide/zinc oxide and still don’t create the white cast effect. And my favorite setting powder ever (RCMA No Color Powder) has silica in it and yet it does not cause flashback. The reason the Flashback Mary conundrum even happened is because this particular YouTuber coated his entire face heavily in setting powder. The reflective nature of these ingredients, when used in large amounts like that, will cause the flash photography light to bounce back and create that effect. You could use the same powder he did, but in a much smaller amount, and have no issues. Really, the simple answer is: if your products contain a large amount of any of these ingredients, just use a light hand. You really don’t need that much powder on your face, so I wouldn’t stress too much about this happening.

Doing Your Own Wedding Makeup_ (4).png

They may be intimidating but false lashes look fan-freaking-tastic in wedding photos. My favorite are demi-wispy styles. They’re natural enough to not be over-the-top but give just enough “umph” to up your makeup game. I suggest buying a 5-pack and practicing, because applying falsies is not an easy feat and definitely not something to be trying out for the first time on your wedding day. But they’re worth the learning curve!

You’ll need lash glue, and I find a pair of tweezers helps me with placing them as well. You may need to trim the lashes to fit your eye, so before you apply any glue, put the lash on your lash line and see if it’s too long. Trim as needed. Then apply the lash glue and let it sit for about 30 to 45 seconds. If you try to put the lashes on too soon without giving the glue time to start drying enough to be slightly tacky, the glue will just slip and slide around and not actually stick. So these few seconds you’re waiting are a huge part of easy application. Pick the lash up with your tweezers and start in the middle of your eye when placing. Once the middle is secure, you can adjust the inner and outer edges. Once the lash is placed and seems to be set (you know, not lifting or moving around), carefully pinch your natural lashes and your false lash together in a few areas, to help blend them all together. And practice, practice, practice!

Here’s an example of some natural-style lashes that simply add the most perfect touch of drama to the look.

53185804_2044375469017440_8242451461212995584_o.jpg
Doing Your Own Wedding Makeup_ (5).png

Our faces, necks, and chest tend to be all different tones. The neck is generally lighter than the others, since our head is blocking it from the sun. The face can either be similar to the neck’s tone, or more similar to the typically-darker chest, depending on whether or not you wear SPF. If your wedding outfit is low cut and shows your chest, you’ll want to keep that in mind when selecting a foundation shade. You may feel quite strange that the foundation you’re putting on your face is not the same shade as the skin that it’s covering, but take a step back and look at the big picture of it all. Scan your face from your jaw and chin to your chest - do they look similar in tone? Good! You want everything to blend seamlessly. You don’t want your face to be way lighter or way darker than your body, and in order to make everything cohesive, you may need to bring the foundation down onto your neck and even your chest, so that it blends without a solid line of demarcation. Apply your makeup in front of a window with good day light streaming in. This will give you the most accurate representation of shades.

Whether doing your own makeup for your wedding or leaving it to the professionals, it should be a relaxing experience, so put on some good tunes and enjoy that precious time!

Did you do your own makeup for your wedding? Tell me how it went in the comments! And don’t forget to follow me on Instagram and Facebook for tons of makeup inspiration!